Scaling WordPress is something I’ve been studying for a long time. By nature, WordPress isn’t designed to run on multiple servers unless you do some re-architecting on the server-side. Finally I’ve found a way to scale WordPress elastically and on demand. ?What I’m about to share has worked for me personally and I don’t guarantee it will work for everyone. Nevertheless, this approach will probably work for most people.
Scaling WordPress – The Problem
There are a number of challenges when setting up WordPress to run on multiple EC2 instances, or any other type of instance for that matter. I use AWS infrastructure and will be using AWS terminology from now on. Some of the challenges when scaling WordPress are:
- media uploads
- plugin management
- WordPress updates
- code deployments
- session management (if you use it)
- caching
- cron jobs
The issue is that all of the above is typically managed by a single instance. If we’re running a cluster of instances behind a load balancer, things can get out of sync very quickly. One solution is to just use NFS (Network File System) to ensure file consistency across the cluster. This works really well if you have a static and predictable number of instances behind a load balancer. However, when you need to scale, or even better auto-scale, NFS just doesn’t cut it. Firstly, it introduces a single point of failure and configuring NFS with auto-scaling is not simple. There is also a question mark around NFS read/write performance.
Another solution is to use GlusterFS, which is a scale-out network-attached storage file system. GlusterFS is gaining popularity in Cloud Computing and it is something I will be evaluating in the near future. So far, I have heard some really good stories about GlusterFS performance. However, configuring GlusterFS with AWS auto-scaling also seemed a little complicated, so I went with a simpler solution.
Scaling WordPress – The Solution
My 3rd and adopted solution was to use the good old rsync with a couple of other nifty scripts and WordPress plugins that help me maintain consistency across the ELB (Elastic Load Balancer). ?So to manage media uploads, the easiest and the most reliable solution is to upload all your media assets to S3. ?There are a number of plugins that allow you to do this, and the one that works really well for me personally is Amazon S3 and CloudFront. This will take care of media uploads.
Code deployments, plugins and WordPress updates can be managed with rsync. ?However, the only way to implement rsync successfully is to have a master server that ALWAYS gets updated first. Only then we can rsync the file changes to slaves. So how the hell do I know which server is the master server when we have multiple instances running WordPress behind an elastic load balancer that scales horizontally all the time? The way I do this is, I have a sneaky little instance with an elastic IP address that serves all wp-admin requests using Nginx reverse proxy. The master instance isn’t attached to ELB. ?That way, I know that the master instance doesn’t and will never belong to any auto-scaling instances.?Having a master instance isolated like that gives me a piece of mind that when I update or push code to that instance, I can then rsync to slaves in orderly fashion. More on syncing to slaves later… ?Deploying code to a WordPress instance is a discussion for another blog post, but from auto-scaling point of view, you only need to push your code to a known instance with an elastic IP. No problems there. You can also implement a periodic sync from master to slaves, which can run every few minutes depending on the size of your application stack.
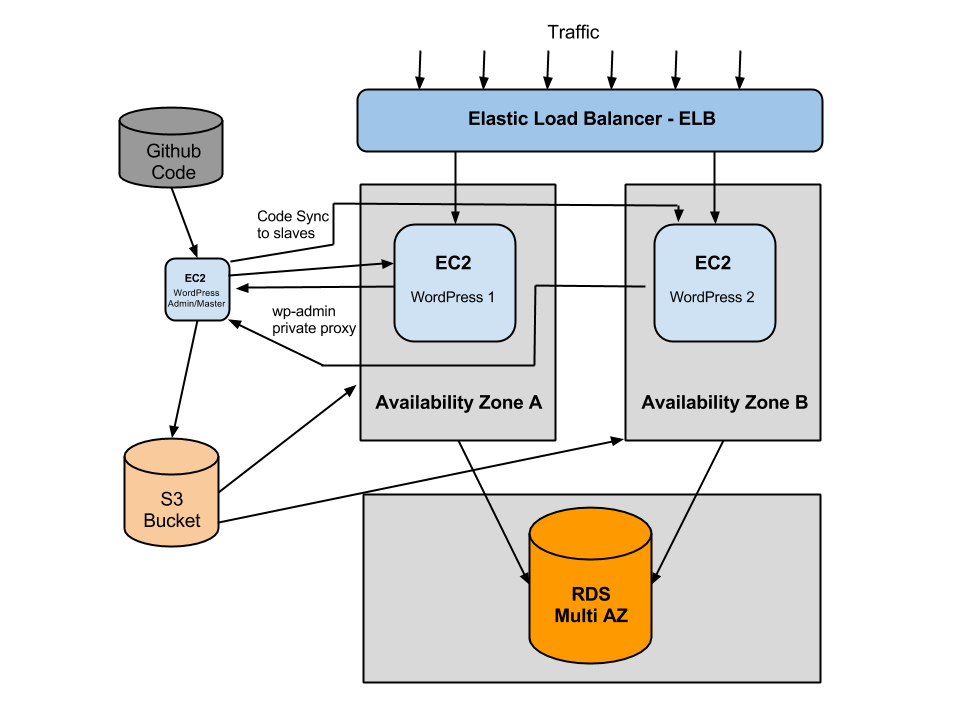
To help understand this a bit better I drew up a high-level architecture diagram of all components in the stack.

So how do we scale out on demand? Auto-scaling out involves launching one or more instances from an Amazon Machine Image (AMI)?and attaching the instance(s) to existing ELB. To ensure that we are launching an instance from AMI that is ready to serve traffic, we need to take an AMI snapshot every time new code is pushed to master instance. Apart from taking a AMI snapshot, we need to update Auto Scaling Launch Configuration which will then be used to launch more EC2 instances from the latest, pre-configured image. This is called a frozen pizza-model. It’s important to note that when scaling WordPress you need to launch a new EC2 instance from a SLAVE?image. What I do, I take a snapshot of both master and slave, but scale out form slave AMIs only. ?This is because slave AMIs are already configured to route wp-admin requests to the master instance.
In terms of caching methods, all should work well. However, Memcache is probably the best candidate for this kind of architecture (not on the diagram above). ?I personally use APC caching, therefore Memcache isn’t included in the diagram above, but it’s on my list of things to implement. I have tried using AWS ElastiCache as an external cache server and it worked beautifully with W3 Total Cache plugin. But more on that in another blog post. Using APC caching means that each instance has it’s own APC cache storage. ?To maintain consistent user experience, you can enable sticky-sessions on the Load Balancer to ensure that each request is directed to the same instance with the same set of cached objects. ?This will also solve your session management problem if you are using session data with WordPress.
WordPress Cron Jobs
Another issue when scaling WordPress out horizontally are cron jobs. ?WordPress cron jobs run slightly differently from traditional system cron jobs. ?WordPress cron jobs are triggered by incoming HTTP (website) requests that don’t always happen when the cron jobs are scheduled to run. ?In other words, cron requests are piggybacked on regular website visits, which can increase load on the server and the bandwidth costs. ?When running WordPress on multiple instances this can lead to duplicate cron jobs to run across the cluster. The solution is to disable WordPress cron jobs and offload this task to a system cron that can is more reliable. ?The advantage of offloading WordPress cron job to a system cron is twofold. System cron is reliable and will always fire on time. This can also greatly improve your server response time and reduce your bandwidth costs. ?To disable WordPress cron edit your wp-config.php and add the following at the top of the file:
define('DISABLE_WP_CRON', 'true');
Now we just need to ping http://www.yourwebsite.com/wp-cron.php at a regular interval. Every 10 minutes should be frequent enough for most websites. ?You can make this more frequent if you like. ?If you host your website on a Linux server, create your cron job like so:
sudo nano /etc/cron.d/wpcron
#Ping my wp cron, every 10 minutes
*/10 * * * * wget -q -O - http://www.yourwebsite.com/wp-cron.php
Cron jobs sorted.
WordPress Auto Scaling Configuration
Now we are ready to create our AutoScaling group and configuration for WordPress. I find the easiest way to do this is with AWS CLI. ?So first thing is first:
1. Create Auto Scaling launch configuration:?
aws autoscaling create-launch-configuration --launch-configuration-name myLCF --instance-type m1.small --security-groups myapp-elb1 --image-id ami-xxxxxx --key mykeypair --instance-monitoring '{"enabled":0}'
Where myLCF is your launch configuration name, m1.small is instance type that will be used when scaling out, myapp-elb1 is the security group to be allocated for the launched instances,?ami-xxxxxx is AMI id to launch new instances from, mykeypair?is the key pair to be used to access this instance. ?If you omit this parameter, your instance will be inaccessible. ? There is one issue here though. ?We can’t always launch new instances from?ami-xxxxxx. Why? Because AMI will change as soon as we update the codebase on production servers. ?Therefore we need to have an automated script that will create a new image and update the launch configuration with the new AMI. ?I’ll show the code for that in the next section (Code for deploying WordPress).
2. Create Auto scaling Group
aws autoscaling create-auto-scaling-group --auto-scaling-group-name myGN ?--load-balancer-names lb-myapp --min-size 1 --max-size 5 --launch-configuration-name myLCF --availability-zones ap-southeast-2a ap-southeast-2b --health-check-type ELB ?--health-check-grace-period 120
3. Add scale out policy
aws autoscaling put-scaling-policy --policy-name myapp-scaleout-policy --auto-scaling-group-name myGN --adjustment-type ChangeInCapacity --scaling-adjustment 2 --cooldown 120
This will output an ARN, which you will need to save somewhere safe. It will look something like this: arn:aws:autoscaling:ap-southeast-2:551620567105:scalingPolicy:….. ?You will need this ARN to set up your Auto Scaling alarms, explained in later steps.
4. Add scale in policy
aws autoscaling put-scaling-policy --policy-name myapp-scalein-policy --auto-scaling-group-name myGN --adjustment-type ChangeInCapacity --scaling-adjustment -1 --cooldown 300
Here you’ll notice that the scale in –cooldown period is 300, which is significantly longer than the scale out cooldown period. The reason for this is to get the most out of your auto scaling instances. Once they are launched, you will get billed for 1 hour even if you terminate them after 5 minutes. For that reason you want to scale out as quickly as possible, but scale in slowly to avoid any cost leaks by not scaling in too quickly and unnecessarily launching more instances.
5. Put Metric Alarm – Scaleout
aws cloudwatch put-metric-alarm --alarm-name AddCapacity --metric-name CPUUtilization --namespace "AWS/EC2" --statistic Average --period 60 --threshold 80 --comparison-operator GreaterThanOrEqualToThreshold --dimensions "{\"name\":\"AutoScalingGroupName\", \"value\":\"myGN\"}" --evaluation-periods 1 --alarm-actions arn:aws:autoscaling:ap-southeast-2:55162056......
This will set up an alarm that will trigger my scaling out policy
6. Put Metric Alarm – Scale In
aws cloudwatch put-metric-alarm --alarm-name RemoveCapacity --metric-name CPUUtilization --namespace "AWS/EC2" --statistic Average --period 120 --threshold 40 --comparison-operator LessThanOrEqualToThreshold --dimensions "{\"name\":\"AutoScalingGroupName\", \"value\":\"myGN\"}" --evaluation-periods 2 --alarm-actions arn:aws:autoscaling:ap-southeast-2:......
Code for Deploying WordPress
The following code examples demonstrate how I deploy WordPress updates across multiple instances behind a load balancer. These examples work really well for me and I can’t guarantee that it will work for you. ?Every application is different, but as a general guideline, this should work in most scenarios. ?How you get your code to your master server is up to you. ?There are many ways you can do this and I’ll leave that step up to you. ?I personally use DeployHQ. I won’t go into details of DeployHQ here, I could easily write another blog posts about that alone. ?All I can say is, DeployHQ is amazing. ?I used to use Capistrano until I came across DeployHQ. Capistrano is also an excellent tool, I just prefer DeployHQ now.
Ok, now that I have my code deployed on my master instance, now I need to trigger another process that synchronises all ELB instances with the master. ?For the following script to work you will need 2 things:
So here we go. This piece of code will:
- Check if there are any pending or failed AMIs from previous processes. ?There shouldn’t be any, unless you deploy twice in a very short period of time. I learnt my lesson the hard way.
- Sync the code to all slave instances behind the load balancer
- Create AMI of Master instance
- Create AMI of a single slave instance and save AMI ID for the next step. (Also see WordPress Auto Scaling Configuration comment under step 1 above.)
- Create new launch configuration with updated slave AMI so that if Auto Scaling kicks in, the system will scale out from an updated AMI.
- Update Auto Scaling Group with the new launch configuration
- Save the latest launch configuration to disk with a timestamp appended for logging purposes. (Should probably log this to a file instead)
- Upload the latest launch configuration name in latest.txt file to S3 – just for good measure in case I want to use it for something else.
#!/bin/bash -e

export AWS_CONFIG_FILE=/root/awsconfig
export PATH=$PATH:/usr/local/bin

profile="default"
master_instance_id=$(wget -q -O - http://169.254.169.254/latest/meta-data/instance-id)
timestamp=$(date +%Y%m%d%s)
iamkey="mykey"
description="My Master Image"
slave_description="My Slave Image"
security_group="myapp-elb1"
image_master_prefix="myapp-master-"
image_slave_prefix="myapp-slave-"

# Auto scaling params
config_prefix="myLCF"
config_s3_path="/launchconfigs/"
instance_type="m1.small"
min_size="1"
max_size="5"
as_group_name="myGN"

#Do we have any pending or failed AMIs? If so abort.
pending=$(aws ec2 describe-images --owner self --filter '{"name":"state", "values":["pending", "failed"]}' | jq '.Images | length')

if [ $pending -gt 0 ]
 then
        echo "Pending or failed AMIs found. Aborting..."
        exit
fi

# sync to slave instances.
./sync_to_slaves.sh

#Note hard coded security group. Can't figure out how to add a variable inside values parameter
reservations=$(aws ec2 describe-instances --filters '{"name":"instance.group-name", "values":["myapp-elb1"]}' --profile $profile --no-verify-ssl | jq '.Reservations')

slave_instanceids_ids=`echo $reservations | jq '.[].Instances[].InstanceId' | sed s/\"//g`

#Get private IPs and reload php-fpm
private_ips=`echo $reservations | jq '.[].Instances[].PrivateIpAddress' | sed s/\"//g`

#Store private IPs in array
private_ips=($private_ips)

for private_ip in "${private_ips[@]}"
do
        echo $private_ip
        ssh -t -oStrictHostKeyChecking=no -i ~/.ssh/$iamkey.pem ubuntu@$private_ip 'sudo service php5-fpm reload'
done

#Store instance ids in array
slave_instance_ids=($slave_instanceids_ids)

for slave_instance_id in "${slave_instance_ids[@]}"
do
        echo $slave_instance_id
        break
done

# Create a new image and get the AMI id
master_ami=$(aws ec2 create-image --instance-id $master_instance_id --no-reboot --name $image_master_prefix$timestamp --description "${description}" | jq '.ImageId' | sed s/\"//g)

# Create a new slave image and get the AMI id
slave_ami=$(aws ec2 create-image --instance-id $slave_instance_id --no-reboot --name $image_slave_prefix$timestamp --description "${slave_description}" | jq '.ImageId' | sed s/\"//g)

echo "Creating Launch configuration ${config_prefix}${timestamp} ..."
# create new launch configuration with new slave AMI
aws autoscaling create-launch-configuration --launch-configuration-name $config_prefix$timestamp --instance-type $instance_type --security-groups $security_group --image-id $slave_ami --key $iamkey --instance-monitoring '{"Enabled":0}'

echo "updating auto scaling group..."
# Update auto scaling group name
aws autoscaling update-auto-scaling-group --auto-scaling-group-name $as_group_name --launch-configuration-name $config_prefix$timestamp --min-size $min_size --max-size $max_size --availability-zones ap-southeast-2a ap-southeast-2a --health-check-type ELB  --health-check-grace-period 300

echo "save launch config file locally..."
# save the latest launch config to the file
echo "${config_prefix}${timestamp}" > /opt/launchconfigs/"${config_prefix}${timestamp}.txt"

echo "upload launch config name to S3"
#Upload latest launch configuration to S3
s3cmd -c /root/s3cfg put "/opt/launchconfigs/${config_prefix}${timestamp}.txt" s3://"${config_s3_path}${config_prefix}"/

echo "create launch config file symlink to the latest name"
# create a symlink to the latest launch config
s3cmd -c /root/s3cfg cp "s3://${config_s3_path}${config_prefix}/${config_prefix}${timestamp}.txt" s3://"${config_s3_path}${config_prefix}/latest.txt"
As you can see I have a separate script that syncs files to slave instances in sync_to_slaves.sh. This could be handy if you have other tasks running the script. For example, you might want to set up a cron job that periodically syncs files from master to slaves.
So here we go:
#!/bin/bash

export AWS_CONFIG_FILE=/root/awsconfig
export PATH=$PATH:/usr/local/bin
profile="default"
syncdir="/path_to_your_webroot/"

#get my load balanced instances
reservations=$(aws ec2 describe-instances --filters '{"name":"instance.group-name", "values":["myapp-elb1"]}' --profile $profile --no-verify-ssl | jq '.Reservations')

private_ips=`echo $reservations | jq '.[].Instances[].PrivateIpAddress' | sed s/\"//g`

#Store ips in array
private_ips=($private_ips)

for private_ip in "${private_ips[@]}"
do
        #TODO. Check that the instance is running. If instance stopped and not in ELB, it will still show in this array of IPs
        sudo rsync -av -e "ssh -oStrictHostKeyChecking=no -i /home/ubuntu/.ssh/mykey.pem" --delete --exclude "wp-content/cache/*" --exclude "uploads/files/*" --rsync-path="sudo rsync" $syncdir ubuntu@$private_ip:$syncdir
done
Proxy WordPress admin requests to another (master) server
One last piece of the puzzle is how to control plugins downloaded directly via WordPress admin? You would really want them to be downloaded on the master instance, and then synced across to slaves. If you don’t ensure this one-way traffic, things can get out of hand. I personally object to downloading and updating plugins directly on the production system. What if the update fails or breaks the website. As they say, shit happens. You are much better off managing your updates via the deployment script explained earlier in this post. However, proxying your admin requests to another server has other advantages. You can use a much smaller instance to manage your admin site. This approach adds very little or no additional load to your ELB instances that serve your website traffic. Proxying your wp-admin requests to master server is a simple nginx configuration that looks like this:
upstream masteradmin  {
 ip_hash;
 server your_server_private_ip_goes_here;
}

location ~ ^/(wp-admin|wp-login\.php) {
        proxy_pass  http://masteradmin$request_uri;
        proxy_next_upstream error timeout invalid_header http_500 http_502 http_503;
        proxy_set_header        Host            $host;
        proxy_set_header        X-Real-IP       $remote_addr;
        proxy_set_header        X-Forwarded-For $proxy_add_x_forwarded_for;
        proxy_pass_header       Set-Cookie;
}
This ensures that all WordPress admin requests are proxied through to your Master instance that’s not behind the load balancer (see the diagram above). I would also prevent public access on port 80 to that instance for tighter security.
I think that mostly covers everything you need to scale WordPress like crazy. There are improvements that you can make to this process I’m sure and I’d love to hear your thoughts on them. One improvement I would make is have another process that removes old/redundant AMIs and launch configurations that are created by each deploy. In fact, you would need to remove them at some point because, as of writing of this post, AWS has a limit of 100 launch configurations per AWS account. I currently clean up launch configurations and AMIs periodically using AWS CLI and AWS console respectively. It would be nice to automate that. Also, if your master instance IP changes, you would need to update your nginx proxy IP to reflect that change. Thankfully, the master instance IP hardly ever changes as it’s out of the load balancer and it’s not part of the Auto Scaling group.
UPDATE: I just wrote another blog post about programatically removing aws launch configs and automating the process.
That’s it folks. This implementation is 100% mine and it involved a lot of head scratching. I hope you find this article useful and that you take out the good bits from it and hopefully implement some of these techniques in your projects. As always, I’m keen to hear your feedback.
Marko